Showing posts with label Simulations of War. Show all posts

Monday, July 16, 2018

REPOST: What if they gave a war and nobody came?

This blog has been around for a while. Some of the posts were and are more popular than others. It would be a pity for some of the new readers not to get a chance to read those posts. In that spirit, time by time, I'm going to be re-posting some of the oldies. Be advised, some of them are quite old and may contain inaccuracies, grammar and spelling errors.

I learnt the names of every wood and all the villages, I knew the contours of the hills and the shapes of the lakes in the valley. To see so much and to see nothing. We might have been the only men alive, my two signalers and I. And yet I knew there were thousands of hidden men in front of me ... but no one moved, and everyone was waiting for the safety of darkness.

P. J. Campbell. British artillery officer during World War I.

After 40 minutes of Combat Mission PBEM simulated combat against my friend Olav, I feel the quote above puts it very well.

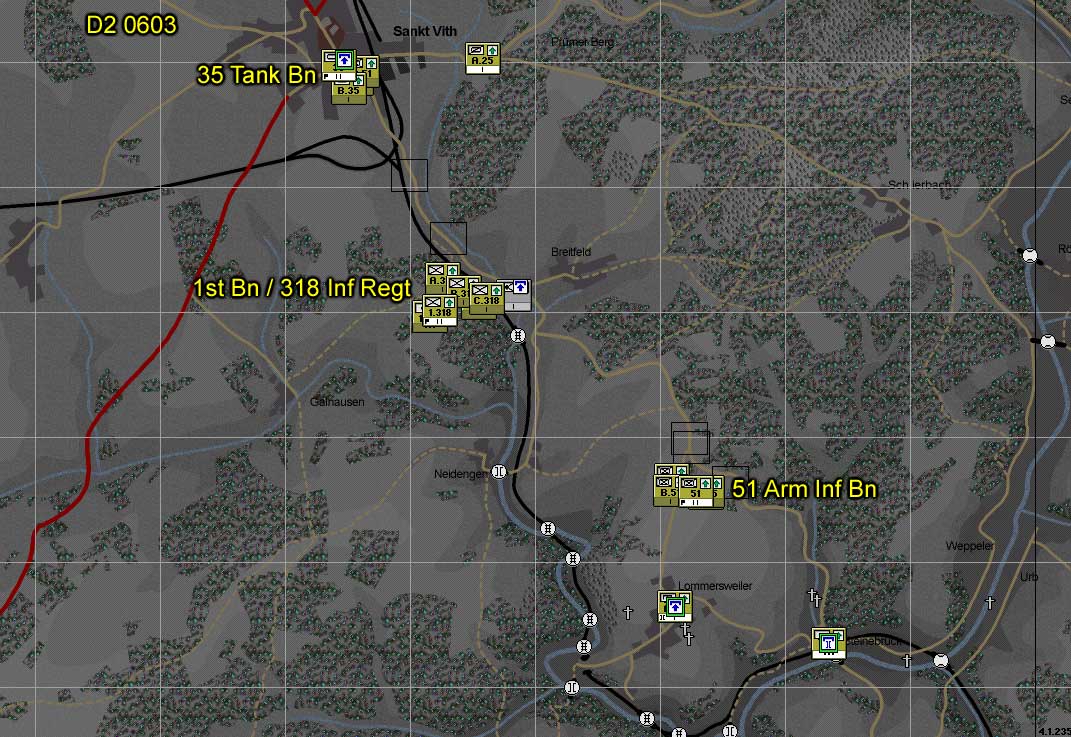
This is all I knew about the enemy during good part of the battle. Red question marks are suspected enemy positions. The absence of enemy icons reflects that no contact has been made. Click the image for an expanded view.

The modern battlefield is a very empty one.

Cheers,

Monday, February 7, 2011

ArmA 2 Operation Arrowhead British Armed Forces - Checkpoint Repels Insurgent Attack With .50 Cals

The game: ArmA 2 Operation Arrowhead British Armed Forces
The situation: a patrol section (+) manning an unfinished checkpoint is caught by surprise by insurgent forces.
The topic: in open terrain the .50 cal is king. Hone your HMG techniques of fire, lads!

The engineers came, built a half-assed checkpoint and left with the promise of finishing it up the following day. Checkpoint North was born out of wire, earthen parapets, small sandbagged bunkers and the willingness of the British soldier to do whatever it takes to accomplish a mission. Our command post/living quarters was a nice change, though. We have been sleeping near our Jackals for quite a while and having a roof over our heads was a welcomed change in the routine.

The entrance to checkpoint North.
Rush hour at checkpoint North. The line is a whooping 10 cars long.

The search area of checkpoint North. We didn't even have the proper search tools. 

Panoramic view of the checkpoint. In the distance, cars wait to enter towards the search area. The whole checkpoint is surrounded by a perimeter of concertina of approximately 500 meters. More visible in the image, the wire was also laid out at each side of the road.


On the right side of the road, we placed a Jackal in a firing position overlooking the main approach to the checkpoint. The command post/living quarters can be seen on the left.

Same thing on the left side of the road.
The reasons why we ended manning checkpoint North with so few assets are hard to justify. Our patrols platoon was conducting presence patrols in the area when the order to set up a checkpoint came in. Our CO decided not to interrupt such patrols because he got HUMINT about "something out of place with the insurgents cell phone traffic". We ended up at checkpoint North with just three Jackals (three teams or a reinforced section). A platoon should not be split when the enemy is in the bushes ... This is true since the time of the Boer Wars.

It was while following a HUMINT tip at a village south of the checkpoint when the distant sound of an IED and the ensuing frantic radio calls reached my 5 men team. We jumped in our Jackal and rushed towards the checkpoint trying to sort out what was going on.

The smoke and fire in the distant checkpoint ... Nothing good is coming out of this thing.
As we approached the chekcpoint, we could see the smoking trails of SPG-9 recoilless guns fired at the two Jackals that were already in position. There was only two vehicle fighting pits at the checkpoint and we needed a hull down position immediately. The Jackal is moderately tall, and hard to "hull down". Out of desperation I drove our vehicle behind the cover of the command post.

Hull down, but with an exposed gunner. Such is the life of the lightly armored vehicle crews.
The view from our vehicle. In the distance, insurgents pour out of an assortment of vehicles.

The AI does a moderately good job shooting the L111A1, but I eventually I had to man the thing. Note the sandbags of the roof of the command post.
Mayhem. In the crosshairs, a vehicle mounted SPG-9 I just engaged with the .50 cal. In real life, any soldier worth of his profession would have the ranges already figured out. He would even planted stakes to mark those ranges. In this scenario, I just fired in a Z pattern until I hit the bloody insurgents. The optics of the L111A1 really paid off.
We have been lucky. The insurgents approached over open terrain and our fields of fire were wide and deep. We lost two men and a Jackal to the enemy's SPG-9s. The checkpoint held without using a single AT weapon.

We eventually abandoned the relative safety of the checkpoint and moved up the road to clear it. In this image, the Jackal covers us with the .50 cal. 

Never underestimate the power of the .50 cal.

Cheers,

Sunday, January 30, 2011

Air Assault Task Force - Mini Thunder Run

The game: Air Assault Task Force
The scenario: a US Cavalry company reinforced with engineer assets is pushing into Baghdad and trying to spoil an ongoing Iraqi Army withdrawal.
What I want to share: fire and maneuver while on the run with a platoon of M1A2 Abrams tanks.

Click the image for an expanded view. The graphics are a bit dated (this scenario is quite old), but you have to give it to me that ProSimCo games rock when it comes to immersive military command decision making. The white slashed areas are urban terrain of different densities. Our axis of attack (Warrior) is a nightmare: obstacles (not depicted since I don't know where they are) and AT missile ambushes along the roads (white lines) leading to the bridge south of objective Fox.
Click the image for a better view. Black grids on the map are squares of 1 km.  Our order of battle is shown in the right pane of the user interface. I'm going to advance towards phase line Falaise with the First Platoon (4 M1A2 Abrams) up front and the Second Platoon (4 M2A2 Bradleys) in a follow and assume posture/mission. I'm going to avoid the main road on axis Warrior because it is likely that the AT missiles are aimed directly to them. The edge of the urban terrain south-west of the main road is particularly good for AT positions and I plan to clean it up with the tank platoon.

I know, I know ... urban terrain and tanks do not mix well. But I'm claiming extreme time constrains. An infantry platoon with a "clear" order would take no less than two hours to clear that amount of terrain.

Click the image for an expanded view. First Platoon is in the center of the map, just a few hundred meters before entering the hot zone. The First Platoon will move northeast but keeping itself southwest of the axis Warrior. Selecting a "staggered column" formation for this platoon would result in each individual tank too separated from each other and this would generate mutual support issues.
Click the image for an expanded view. To make sure each tank can support by fire the rest of the platoon I select "none" as the formation and drag the tanks very close to each other.
Click the image for an expanded view. The First Platoon is selected (note the green squares/outlines on each icon in the map) and ready to move (the little green arrows are the waypoints for the Platoon). Most important: the "suppress" order (blue cross with a surrounding green circle): whatever hostile unit is detected within that circle will be fired upon by the tanks. 
Suppression is the name of this game, folks!

Click the image for an expanded view. We made contact right away. The range is close and murderous. In the screen above, the Platoon fires and suppress the enemy position. Note the "S" marker, for suppressed. 
Click the image for an expanded view. I had to move the Platoon really close to identify the enemy position. Now with the unit identified, I can issue a "TRP" order to the platoon so they use their fires to destroy the enemy unit. This AT-5 team, if un-suppressed, would kick our asses from 3 kilometers away. So watch it.

The first AT-5 team is destroyed and I move my units right away. Very important: re-issue a "suppress" order in front of the First Platoon, so they fire away against any hostiles they find on their way.

Click the image for a better view. We are moving and kicking butt. The red "X"s are enemy AT-5 positions destroyed. In the screen shot above, the First Platoon has just encountered another one and I'm issuing a TRP order. It's quite a pleasure to hear the sound of the main guns blasting the enemy position at point blank range.

Click the image for an expanded view. The First Platoon (red and white flag with a number 1) has cleared 3 km worth of AT ambushes (7 of them, marked as red "X"s in the map) and stops short of phase line Falaise. Unfortunately, we lost a tank right at the end (blue "X" in the map) of the run. 
Cheers,

Thursday, December 16, 2010

Panzer Campaigns Kharkov 43 - Keep the Infantry Moving

Operational and strategic mobility is are usually bound to the road network.

In PzC's Kharkov 43, the winter weather conditions are forcing me to conduct a good portion of the tactical maneuvers near the roads. In particular, infantry. Not that they can't move through the open ... It's just too taxiing for them to do so.

This company from the 320th Inf. Div. will be walking roads until it makes contact. The highlighted hexes are the reachable ones. Note how mobility is double if the grunts keep their feet in the road. Any movement aside the road will reduce their mobility to half. From the "Gross Deutschland leads the way" scenario.
Cheers,

Tuesday, December 14, 2010

Military Monday at SimHQ - ArmA 2 Operation Arrowhead

A great video by Brennus on the "Military Monday" online session with ArmA2 Operation Arrowhead.

Infantry supported by a Warrior IFV, clears a roadblock and moves onto a guerrilla campground.


"Military Monday" is an online session hosted by SimHQ. The players follow a chain of command and radio communications protocols. Realistic tactics are highly encouraged.

Original thread here. Make sure to view this video in YouTube for HD.

Cheers,

P/S: anybody here joins these sessions at SimHQ? Anybody plays ArmA 2 online at a virtual unit?

Cheers,

ArmA 2 Operation Arrowhead PMC - Why I am still interested

[...] private military forces offer a level of flexibility and promise of efficiency when coping with threats to global market function. An example of this was see most recently in the havoc created by Hurricane Katrina in New Orleans. When the federal government, because of bad management and legal barriers using federal forces, failed to act, PMCs stepped into some of the breaches. Companies such as Blackwater and others quickly sent forces to New Orleans to protect high-value for corporate clients (from looters) and provided extraction details for high-net-worth individuals and valuable corporate employees.
From Brave New War: The Next Stage of Terrorism and the End of Globalization
By John Robb


ArmA 2 is an entertainment product, yet oriented towards a niche of the gaming market. It is a simulation of infantry tactical warfare realistic enough that an off-shot of the original game engine is used for training in military forces around the globe. Popularity and media buzz-wise, the Private Military Comapny (PMC) DLC is not the hottest Bohemia Interactive module. When I got it myself I thought -Meh! What will be next ...a  Red Cross refugee-relief module?

There is an entire school of thought that is raising the flag about sovereign states no longer having the monopoly in the delivery of violence against masses of people. Violence at a scale that can tip the political stability of a whole state. John Robb is in the cutting edge of this idea that was originally put forward by Martin van Creveld. Global terrorism and the Mexican drug cartels are two examples of the new actors in this whole new game the world is witnessing. The idea of a state without the resources (legal or material) to cope with non-state threats to its existence is scary. But even more scary is the idea that anybody with enough money can pay to enter the game. And I am not talking about the "10 dollar Taliban" that can't hit a cow in a corridor with his cousin's 20-year-old assault rifle. I am talking about ex-special operations veterans armed with modern weaponry that can bring down a building in their sleep. Enter the private military contractor ...

Although the political, strategic and operational minutia of the fictional war in Takistan are out of reach for the ArmA2 OA PMC player, the tactical grind of the simulation offers a rare opportunity to experience the life of the military contractor. And I say rare not because this is the first "mercenary" shooter in the market but because is the only one that we can hope will deliver the goods in a way more close to reality. Under-manned,  under-gunned, no indirect fire support, tactical mobility not a lot better than your wife's during a trip to the mall, with a huge baggage bogging down the tactical tempo (do we really need to protect these clients? ;) ), the challenge will be there. Unfortunately, the canned missions of the PMC DLC are not that appealing. At least for me, ArmA was never at story-telling and I was not actually hoping anything stellar with this module. But the sandbox is open for mission creators!

And now if you excuse me, I have to finish my read of the FRAGO contract and send my SITREP invoice to my commander client. :)

Cheers,

Tuesday, September 28, 2010

ArmA 2 Operation Arrowhead British Armed Forces - On Being Section and Fireteam Leader at the Same Time - Part 1

The British Army's small-units tactical doctrine is secret. No field manual for you, civilian! There are a few books out there from which you can make up some pieces of the puzzle. But ... oh boy ... these accounts show you only shadows.

I will be out on a limb with these series of posts about the use of British Sections in ArmA 2. So take them with a big grain shovel of salt. Non-educated guesses coming.

The composition of a generic British rifle section is one of the few things we know for sure :
  • Section Commander
  • Rifleman
  • Grenadier
  • Automatic Rifleman
  • Fireteam Leader Section's 2nd in Command (2IC)
  • Rifleman
  • Grenadier
  • Automatic Rifleman
This section has two fireteams (labelled red and blue above) that are quite symmetrical in terms of firepower. Symmetry we can cope with (we have already been fighting with symmetrical US Army and Marines squads), but as you may have realized the British section commander has to keep an eye on his fireteam (red) and the whole section at the same time. The ratio between section and fireteam commanders (movers) over the amount of fireteams (moving parts) is 2/2=1 in the British infantry section. The same ratio is 3/2=1.5 in an US Army infantry squad and 4/3=1.33 in the US Marines rifle squad. 

Short in men and decision-makers, it looks like as if the British infantry section is conceived as a tactical entity that never operates independently from its parent platoon. If this is true, I wonder how challenging is to go into combat with a British section in the ever fragmented battlefields of today where every section or squad mostly fight different fights.

In ArmA2, the British rifle section is composed of (each soldier picture has a short description of his weapon too):

1st Fireteam


2nd Fireteam


Nice surprise in ArmA 2 is to have the so-called "marksman" with the L86A2 light support weapon. This awesome piece of hardware was originally conceived as a support weapon, but since it has a relatively high range (can deliver accurate fire up to 600 meters or so) it is used almost like a sniper role. Almost, because the caliber of the L86A2 is the same as the L86A2.

In the next installment, I will get into a fight along with these men.

Cheers,

Wednesday, September 1, 2010

Command Ops: Battles from the Bulge - Tutorial Scenario - Day 1

With the new patch for Battles from the Bulge, I have no more excuses to not continue with the tutorial scenario.

This is a continuation of a series of entries I made quite a while ago. After a long digression, I settled for a  (sorta) plan.

During the first day  I want to secure the Steinebruck bridge and extend the bridgehead towards Lommerweiler.

The brigade I have available for the first day has one infantry battalion, one armored infantry battalion and one tank battalion. The troops on foot are useless for any assault on the Steinebruck bridge. The enemy occupying the heights of Lommerweiler would have a hay day if I move my foot infantry through the low terrain surrounding the bridge. I decided to use the 51st Armored Infantry Battalion and 35th Tank Battalion for an assault on the bridge. The 1st Battalion-318th Infantry Regiment is of better use if they cross the river where wheeled/tracked vehicles can't and try to attack from some sort of concealment. See tactical plan below.

Opening moves. Click the image to expand it.

Did you know that you can combine both the 51st and the 35th Bns in a single coordinated attack by clicking on one Bn HQ, pressing the Ctrl key, clicking the other Bn HQ and then issuing an attack order? The most senior HQ unit will then be in operational control (OPCON) of both battalions and will guide them through the attack. Only caveat is the increased command load for the HQ unit in control (watch for those in the Cmd tab, listed as "capacity" [how much the HQ unit can handle without too much trouble] and "load" [how much the HQ unit is handling at the moment]). If "load" exceeds "capacity", the two-battalion task force may suffer some extra orders delay. I'm kinda milking the system here, because during the first hour of the scenario there are no orders delays.

 After hours of hard fighting, at 1100 of day 1, my forces finally cross the river. I have detached a cavalry troop for reconnaissance missions. By now I need a larger bridgehead.

It was about time! We have crossed the river.

As soon as some space is gained across the river, the two-battalion task force (51 Arm Inf Bn and 35 Tank Bn) is ordered to pivot west and continue their attack towards Lommerweiler. By this time the foot infantry is in position to attack Lommerweiler in the opposite direction. With the combined firepower of an entire brigade, the enemy breaks down easily. Lommerweiler falls in our hands by mid afternoon.

The gods that wield swords and hold shields have been good with us so far, but the gods that ride horses have been more generous. That cavalry troop that I detached was ordered to conduct a reconnaissance mission towards St. Vith using the east flank of the enemy. The troopers reached St. Vith unopposed and found no signs of the enemy so far. By now the time is 1524 (day 1) and this is a pivotal moment in today's fight. This opportunity needs to be exploited with no delay. See map below for the new set of orders.

Onto St. Vith!

After some 40 minutes of nervous waiting (are orders delay fun or what?) the 35 Tank Bn moves towards St. Vith. The tanks reach St. Vith around 1730 PM with not enemy to shoot at. I feel like I sucker-punched the Germans and I wish I could preserve the battlefield as it is until the next day, when my reinforcements arrive. As the night falls, the enemy continues to attack towards the Steinebruck bridge and to put pressure in my foot infantry near Breitfeld. My troops hold their positions through a long night.

We are ready to be reinforced!

To be continued, stay tunned.

Cheers,

Tuesday, July 13, 2010

Now that ArmA 2 Operation Arrowhead is out, who will care about VBS2 Lite US Army?

Last word I know about VBS2 Lite US Army is that the US Army legal counsel is holding up its release to civilians.

If VBS2 Lite US Army ever gets released to civilians, I wonder who is going to care anyway. With Operation Arrowhead you get a similar geography (a mountainous country side, a desert and a middle-eastern looking city), more equipment, more factions and likely better AI.

US soldiers push towards an Afghan village in VBS2 US Army Lite.

Yet, if ArmA 2 Operation Arrowhead would run as smooth as any of the VBS2 "Lites" ... I would be in heaven.

Cheers,


Friday, July 9, 2010

ArmA 2 Operation Arrowhead - Counter IED Hunter Killer Tactics

Well that was the idea anyway ...

In this fictional scenario, me and my virtual men are trying to capture insurgents that according to HUMINT plan to emplace mines/IEDs in a road span near the village of Sakhe. The objective is to capture them alive for interrogation.

I wanted to experiment with the so-called "hunter-killer" tactics for counter-IED operations. A detailed explanation of these tactics can be found in the January-February 2008 issue of the Armor magazine (Hunter-Killer Teams, by Mjr. Mark Aitken, page 18). Of course this scenario features far less troops than in real life.

The "hunter" team is composed of a squad leader and a marksman. They are emplaced in a vintage vantage point up in the hills.


A full squad of infantry is the "killer" team. They are down the valley, hidden until the last moment.


The thermal sights of the squad leader from the "hunter" team picked up a group of insurgents down the road (white shapes in the third quadrant of the aiming cross).

Warned by the "hunter" team and in command of the "killer" team, I maneuvered the squad as two separate fire teams. Under the concealment of terrain and vegetation, one fire team approached the insurgent group from the north and the other team (closer to me) from the south. I wanted to force these insurgents to surrender.

Unfortunately, even when I ordered my troops to hold fire until the last possible moment, the insurgents took the first shot and we were forced to open up on them. Two insurgents fell prey to the well-aimed fire from the north fire team. Two other insurgents fled south using the road, right into where I was waiting with the south fire team. They aimed their rifles at us, but we got them before they could fire.


The two first enemy casualties, in the background.


These two were fleeing ...


The thermals in ArmA 2 are fantastic

I know we are not the police department, but I would like to see the enemy to surrender in this scenario. :)

Cheers,

Sunday, May 16, 2010

TacNuggets #3: If insurgents cross the street and there is no Marine aiming at them, is the town already lost?


I was a believer that defeat in tactical combat is always due to the cumulative effect of several small, apparently irrelevant failures ...

The game: Combat Mission Shock Force-US Marines Module
The Scenario: Circle the Wagons, by George McEwan
SITREP: A two tank section is bogged down in the middle of an insurgent-controlled town. One platoon of US Marines is on site and will protect the tanks until reinforcements arrive.

The star symbol is the position where the tank section is stranded. I moved one Plt. of Marines forward and I am trying to position them inside buildings, in a wide arch (blue line) located forward from the tank. A long time ago I played this scenario and deployed the Marines in an arch behind the tank section (dotted blue line). This was a mistake; infantry-tank cooperation in these situations needs the infantry ahead of the tank. For the most part, the Marines near the tanks are doing a great job. Now another Plt. has arrived (blue icons in the far background). Just in time, the insurgents are getting really nasty.

The plan is to have the reinforcement Plt to move into the town and move downtown in an axis perpendicular to the position of the Marines near the tanks.

The reinforcement Plt. moves its AAVs through the open using standard bounding overwatch technique. Lots of suppressive fire, these AAVs are surely thin skinned and I don't want to loose any of them to a lucky RPG shot. As planned the AAVs stop short of the town and the Marines disembark under the cover of smoke. The Marines occupy a narrow ditch and orient towards the town. After a few minutes, they move forward to take a foothold on the town. More suppressive fire. Things are going well, but an insurgent team appears on the left flank and draws the attention of everybody. 

In the foreground, an AAV and a two Marine fire teams take aim at an insurgent team that suddenly appeared on the left flank. Another Marine fire team moves forward into the town. In the far background, a mob of insurgents crosses the street towards the immobile tank section. A full Marine squad is in a building at mid-distance between the AAV and the insurgents, but they don't have an angle to shoot at them.

I counted the insurgents that crossed the street to feed the carnage downtown. 25 of them. If this AAV would have been aiming in the right direction, this battle would have ended in an early victory.

Cheers,

Thursday, May 13, 2010

Steel Fury Kharkov 42

Installed and briefly messed around with it. I definitively like it. The manual was slightly better than in the demo. There is a lot to learn yet.


It does look great!

Cheers,